 Apprenticeships
 Construction
 Education Tech
 Engineering
 Franchise Networks
 Legal Firms
 Logistics
 MATs
MATs Recruitment
 Retail
 Seasonal Staff
FrogLMS Community
Managing Sites
The aim of this site is to introduce Learners to find any site in including personal dashboards in FrogLMS.
- Managing Sites Overview – Introduce managing sites
- Searching Sites – Guidance on how to find any site in FrogLMS
- Site Assets – How to access files attached to a site
- HTML Widget – How to add HTML elements
- Changing Ownership – Change the owner / creator of a site
- Restoring Deleted Site – How to restore a site

Managing Sites: Managing Sites Overview
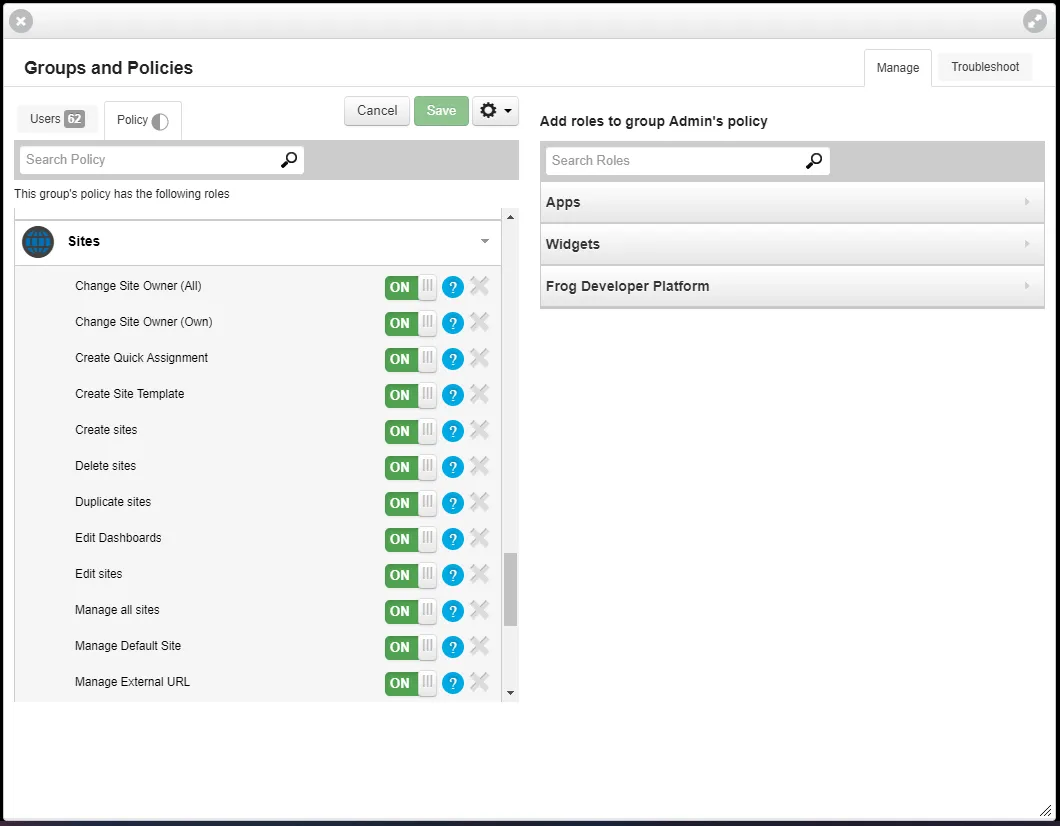
Frog Admins profiles have access to all sites - by default. controlled by settings in Groups & Policies.
These permissions can be granted to other groups, for instance, you may wish to set up a group of Teacher Admins, who have more access than most for sites, but not to System Preferences.
Edit and Manage Access to an individual site should be controlled through the Site's sharing properties.
Things to note
How does Frog work?
Frog stores its information in a database, only accessibly via APIs Application Program Interface . This is a very safe method to store and retrieve information, as it means data and the tables it sits in cannot be deleted or removed accidentally. Everything displayed in the browser has been retrieved using the APIs, including any files uploaded to Frog. This means that any files to be downloaded are first checked to see if the user has permission to view the file.
What is a Frog Site?
A site does not have a HTML file associated with it. Frog Sites exist within Frog's database as a manifest listing the pages, theme and widgets to be displayed.
When a site is opened, the database is contacted via an API, the information is returned and the browser constructs the site as a DIV A DIV is a container for HTML information. from the manifest.
One benefit of this approach is that because each site opens as part of the existing webpage, CSS can be added to a dashboard and propagate throughout Frog.
Each site and page does have it's own web address and can be linked to directly. Accessing the web address will cause Frog's dashboard's to load first, then open the site. To avoid dashboards loading, you can make the site: Public on the Web" - more about this later.
Where are files stored in Frog?
Files are stored centrally and renamed with a unique indentfier, or UUID Universally Unique Identifier . You cannot access these files directly, instead they are retrieved using the API process. (The files are renamed back to their original name on downloading)
The Service Desk has a few extra tools which they can use to export files, although this is not always guaranteed.
Managing Sites: Searching Sites
As an admin, you have access to every site in your school’s FrogLearn.
If you search using the FrogBar’s search tool, you’ll find a couple of limitations. The first being that the results disappear once you have clicked on a result.
The second is that unless a site has been shared with you or made Public in School or on the Web, it won’t show up in the FrogBar search.
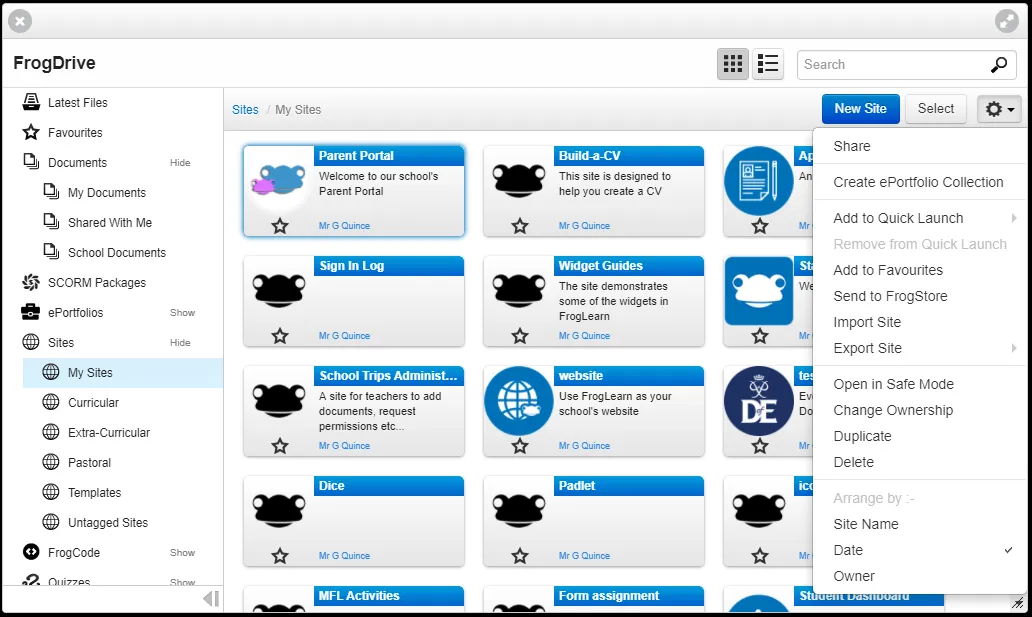
It’s generally better to search via the Sites section of FrogDrive. Using the search box in My Sites, I can search for any name, keyword or author.
In this example, I have searched for the term ‘revision’. I have to hit the enter key to trigger the search. The 3 results returned match those from the FrogBar search, but I also have another link. If I click on All Sites, I can see results for those sites not shared with me.
If I don’t know the name of a site, but I know the author, the search works in the same way. I see all the sites created by that person.
If I want to search for all sites, I can use a percentage sign, %, as a wildcard.
Frog employs an endless scroll for these results, so as I get to the bottom of the list, more results are generated. The results are always in date modified order, with the most recently changed at the top.
If I want more detail, I can switch to the List View. The search starts again and takes a bit longer.
Managing Sites: Site Assets
Site Asset Manager – Files attached to Frog sites
When you upload a file to a site in Frog either as a timeline file or via the text or media widgets, the file enters the assets area. You can reuse a file by expanding the Site Assets on either the Media widget or Link to File widget.
Here you can search through the uploaded files. Most files in this example have a tick against them. This means they are in use somewhere on the site. Files with a cross mean they have been uploaded, but they are not visible on the site. Either the widget they were uploaded to has been deleted, or they were replaced with another file.
In the editing panel for the Link to File and Media widgets, at the bottom of site assets, there is a Clean button. If you click that button, Frog will delete all unused files from your site.
You can also do the same in the Manage Site Assets section. You can find that in the Site menu in the FrogBar.
In the pop up that opens, you will find all the files uploaded from both widgets. There is also the clean option and if you click on the red cross symbol, you can delete individual files.
You might have noticed another icon on a couple of these images. That denotes the file was uploaded to the site timeline. If you open the image by clicking on the thumbnail, you have all the controls you have on the site timeline.
As well as deleting the image, I could assign it from here, edit the details, I can even comment on it and these comments would appear on the site timeline widget.
Let’s take a moment for a quick explanation of the differences between Site Assets and Timeline Assets.
Site assets are file you have uploaded during the building of your site, whereas Timeline assets are files sent to your site during its use.
A quick rule of thumb is: if you have the editing panel open, you’re dealing with site assets, if it’s closed it is timeline.
So why the difference? It’s about making the life of the teacher easier during a lesson. If a teacher wants to use FrogSnap to take a picture and send it to their class site, we didn’t want them to have to edit the site to get that photo to display.
File Drops are the exception which proves the rule. Files uploaded to a file drop add into the site assets
Things get a little confused over the Image Carousel. We know lots of you expect the image carousel to be something you prepare in advance, but our widget is designed to work with timeline assets. And so, you were forced to send images one at a time from FrogDrive over to the site. However, we’ve update the Site Timeline widget, so you can now upload directly to the site’s timeline. Which should make preparing image carousels a bit easier.
You can also manage the timeline directly, from the Site dropdown, although, you will have to add a site timeline widget to a page to be able to upload directly. You could then leave this widget on the page and make it only visible to Admins using Rules or you could delete the widget after you’re done uploading.
Site Timeline Widget - Frog Community tutorials
Image Carousel Widget - Frog Community tutorials
Site Menu
Site Menu
This menu appears for all sites, except when viewing them as a dashboard. To dropdown menu is permission specific.
Settings
This option is only visible when the site is set to Public on the Web.
Duplicate Site
If a user has permission to create sites (students do not by default) then this option will be visible. The present site will be copied, with a new name and all assets duplicated.
Data Viewer
This option gives you access to any Form submissions, Poll results and Quiz attempts, which are embedded on the site. Data from Forms, Polls and Quizzes is only stored within the site.
Manage Timeline
Every site has its own timeline - just like the Personal Timelines. Images and Files sent to a Timeline will appear here. There is also the Site Timeline widget. Manage Timeline allows you to delete files or edit their names and descriptions.
Manage Site Assets
This section allows you to view the files attached to a site. While files are stored in a separate area of Frog, when the site loads, all the files are checked, and loaded into menus - even if they are no longer directly linked. Keeping the Sites Assets tody reduces loading times.
Print Current Page
Because of the way Frog loads sites, the browser's Print option can get confused. Print Current Page produces a cleaner print option. There is no way currently to print all the pages of a site - you do have to print each one individually.
Managing Sites: HTML Widget
One of Frog’s most powerful tools for web designers is the HTML widget. It allows you to insert HMTL, CSS and JavaScript into a page. This widget is disabled by default, given its ability to affect the platform. If you cannot see the widget in the widget tray, you will need to contact Frog’s Service Desk to activate it.
It is important to note that the Service Desk cannot help you debug your code. You can open Frog or just a site in safe mode and edit the widget if it is causing issues for you.
To open Frog in safe mode add ?safemode to the end of the web address replacing /app.
For example, if your Frog platform’s URL is
https://www.myschool.com
load it as
https://www.myschool.com/?safemode
Individual sites can be opened in safe mode using an option in FrogDrive in the Action Cog.
FrogLearn runs Bootstrap 2.3, Moment.js and jQueryUI and the community has a number of tutorials showing how to add additional functionality. The community forums have a coding section with users sharing code. If you are comfortable with coding, it’s also worth asking us about FrogCode, which gives you the ability to create your own widgets and Frog applications.
Things to note
Supported by the HTML widget HTML
- CSS
- Javascript
- jQuery 1.12.2
FrogLearn is pre-loaded with
- Bootstrap CSS (v2.3.2)
- Moment.js
- jQuery UI
Managing Sites: Changing Ownership
On your FrogLMS:
- Open FrogDrive
- Switch to Sites
- Single-click on a site to highlight it (make a note of the site's title)
- Click on the Action Cog
- Choose the menu option: Change Ownership
- Transfer the site to someone else in school
- Search for the site you have just used - you will probably need to use the All Sites option
- Transfer the site back to you.
Managing Sites: Restoring Deleted Site
The quick launch gives users the ability to delete sites Ability to delete sites is controlled via Groups & Policies . There is an input check and warning each time a user chooses to delete a site, but it cannot be undone by anyone in school. In most cases, it is possible for the Service Desk to undo deletion of a site, but this cannot be guaranteed.